

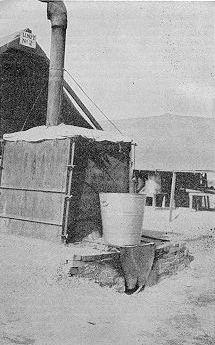
Army Field Bake Oven No. 1
Excerpted from the 1916 edition of the Manual for Army Bakers
[Fire trench] [Front and sides] [Oven chambers] [Top and cover]
The field oven, No. 1, is a portable, knockdown type, for continuous baking. It will bake approximately 3,500 pounds of issue bread, 2,000 pounds of field bread, per day if operated continuously. Each of the 12 metal parts of which the oven is constructed, including the stovepipe and hood, is designated by number. This number, cut from sheet metal, is riveted to each separate part. In submitting requisitions for extra parts the number of the part desired should be referred to. The numbers given in the following instructions refer to the several numbered parts of the oven and run from 1A to 12C, inclusive. In addition, there is a canvas cover, No. 13A, to go over the soil on the top of the oven.
 To set up the oven -- Level a piece
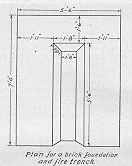
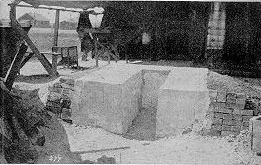
of ground 6 by 8 feet. In the center of the leveled
ground dig a clean-cut trench, 8 feet long, 20 inches
wide on top, 16 inches wide on the bottom, and 24 inches
deep. At the firing end of the trench extend the cut
sufficiently to make a convenient fire pit. In the center
or at one side of the fire pit dig a hole about 1-foot
deep, about large enough to hold a G.I. bucket, for a
drainage hole. Place the trench cover, No. 5A, so that
the front or closed end will extend about 4 inches over
the front end of the trench, the center of the trench
cover over the center of trench. The sides of the trench
cover should fit the ground closely, in order that the
heat and the gas from the fire trench will pass only
through the sleeves of the trench cover.
To set up the oven -- Level a piece
of ground 6 by 8 feet. In the center of the leveled
ground dig a clean-cut trench, 8 feet long, 20 inches
wide on top, 16 inches wide on the bottom, and 24 inches
deep. At the firing end of the trench extend the cut
sufficiently to make a convenient fire pit. In the center
or at one side of the fire pit dig a hole about 1-foot
deep, about large enough to hold a G.I. bucket, for a
drainage hole. Place the trench cover, No. 5A, so that
the front or closed end will extend about 4 inches over
the front end of the trench, the center of the trench
cover over the center of trench. The sides of the trench
cover should fit the ground closely, in order that the
heat and the gas from the fire trench will pass only
through the sleeves of the trench cover.
Placing the front and sides of the oven
 Place the front end of the oven,
No 1A, on the ground in front of the trench cover. Place
the sides, Nos. 3A and 4A, engaging the angle irons with
those of No 1A, the bottom edges of Nos. 3A and 4A
parallel to the trench cover and resting on the level
ground. Clamp the front edges of Nos. 3A and 4A to the
front end, No. 1A.
Place the front end of the oven,
No 1A, on the ground in front of the trench cover. Place
the sides, Nos. 3A and 4A, engaging the angle irons with
those of No 1A, the bottom edges of Nos. 3A and 4A
parallel to the trench cover and resting on the level
ground. Clamp the front edges of Nos. 3A and 4A to the
front end, No. 1A.
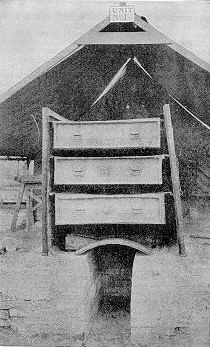
Next place the oven chambers, beginning with the bottom, No 10A, then No. 11B, and then No. 12C. Push the necks of the chambers through the openings in the front end, No. 1A, as far as possible. The front of the chambers are supported by the necks on the front, the rear by flanges which rest on flanges on the sides of the oven.
 Next place the rear end, No. 2A, by
engaging the angle irons at the bottom with the angle
irons of Nos. 3A and 4A. The flanges on the inner side of
the rear end, No. 2A, fit under the chambers. If the
chambers are set too low place a small clip under the
flanges on the sides of Nos. 3A and 4A, to raise the rear
end of the chambers. Clamp the covers. As soon as the
chambers are placed a man crawls into the pit, and lying
on his bake places the flange on the trench cover, No.
5A, over the collar on the bottom of the rear end, No.
2A.
Next place the rear end, No. 2A, by
engaging the angle irons at the bottom with the angle
irons of Nos. 3A and 4A. The flanges on the inner side of
the rear end, No. 2A, fit under the chambers. If the
chambers are set too low place a small clip under the
flanges on the sides of Nos. 3A and 4A, to raise the rear
end of the chambers. Clamp the covers. As soon as the
chambers are placed a man crawls into the pit, and lying
on his bake places the flange on the trench cover, No.
5A, over the collar on the bottom of the rear end, No.
2A.
Placing the oven top and cover
Next place the top of the oven, No. 6A, in position, with the flue hole at the right center. Stop up the edges with clay or mud. Next set up the stovepipe, Nos. 7A, 8A, then the hood, No. 9A. Fasten pipe braces to oven.
 Next cover the top of the oven with
dirt taken from the trench. The dirt should form a mound
about 8 inches deep in the center and 5 inches deep at
the edges. Stop up the cracks around the necks of the
oven chambers with asbestos tape, or asbestos cement, if
available, otherwise with mud or clay.
Next cover the top of the oven with
dirt taken from the trench. The dirt should form a mound
about 8 inches deep in the center and 5 inches deep at
the edges. Stop up the cracks around the necks of the
oven chambers with asbestos tape, or asbestos cement, if
available, otherwise with mud or clay.
Build a fire in the trench, and after the dirt on the top of the oven has dried out put on the canvas cover.
Return to Bread Baking in World War I Army
Bibliography
Deitrck, Capt. L.L., ed. Manual for Army Bakers. War Dept. Doc. 563. Washington: GPO, 1916. 123pp. This material is taken from pages 85-7.
October 1999
| Bulletin Board | Keyword Search |
| Bookstore | Links |
| About Us | Recent Additions |
![]()